
Actual Installer allows you to create an installer package, which can deploy and register your components ( COM DLL or .NET Assembly ) on target computers.
First, you need to add your DLL/OCX files to the package on the Installation \ Files and Folders page. Then, go to Register \ Others and click Add.
In the Register dialog specify:
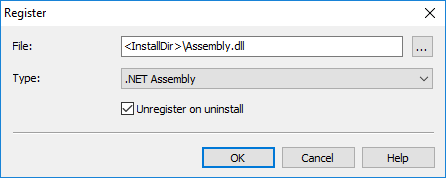
File: specify the file
Type: select DLL/ActiveX for OLE controls or .NET Assembly for .NET DLL
Unregister on uninstall: select this option to automatically unregister the DLL during uninstallation
That's all. The DLL file will be installed / registered during installation, and unregistered / removed during uninstallation.
NOTE: For registering DLL / ActiveX the setup program uses Windows utility RegSvr32.exe which calls DllRegisterServer. The command for registering is:
for 64-bit app:
%windir%\System32\regsvr32.exe "path to DLL" /s
for 32-bit app:
%windir%\SysWoW64\regsvr32.exe "path to DLL" /s
/s means Silent Mode.
For registering .NET Assembly the setup program uses RegAsm.exe (Assembly Registration Tool) with the following parameters:
RegAsm.exe "AssemblyFile" /codebase /s
where /codebase - Creates a Codebase entry in the registry. The Codebase entry specifies the file path for an assembly that's not installed in the global assembly cache.
/s - Silent Mode.
If you need to pass additional parameters, please read below how to make it.
You may also use System \ Commands to register and unregister your DLL files.
The command for registering:
File: 		<SystemDir>\regsvr32.exe
Parameters: 	/s "<InstallDir>\File.dll"
Launch on OS: 	Any
Show: 		Normal
Timing: 	After Installation
Wait: 		Yes
The command for UnRegistering:
File: 		<SystemDir>\regsvr32.exe
Parameters: 	/s /u "<InstallDir>\File.dll"
Launch on OS: 	Any
Show: 		Normal
Timing: 	Before Uninstallation
Wait: 		Yes
The /s switch means the Silent mode (no message boxes will be displayed).
The /u switch means UnRegisiter.
<SystemDir> is an installer variable which returns %windir%\System32 or %windir%\SysWoW64
Please note that on Windows 64-bit, there are two versions of Regsv32.exe file: 64-bit version is located in %windir%\System32 folder; 32-bit version is in %windir%\SysWoW64.
If your aplication and component are 64 bit, then don't worry about the process! Actual Installer uses appropriate regsvr32.exe file. Just make sure to select the 64-bit only option on the General \ Requirements tab. In this case, on 64-bit Windows, <SystemDir>\regsvr32.exe returns %windir%\System32\regsvr32.exe
If you application is 32-bit, but the component is 64-bit, then make the following:
Unselect the option "64-bit only", and add a command for registering:
in the File field type: <WindowsDir>\sysnative\regsvr32.exe. In OS select "64-bit".
Read more about installation on 64-bit Windows.
To make .NET DLL (assembly) working on a target machine, it need to be registered with RegAsm.exe (Assembly Registration Tool), like this:
regasm.exe File.dll /codebase
Regasm.exe comes with the .NET Framework package. So first, we need to ensure that .Net Framework is installed on the target machine. To make it, go to the General \ Software Prerequisites tab and select .NET Framework and required version.
Then we need to get the location of regasm.exe, as it may not be in the environment variables. The location depends on the .NET Framework version:
.NET Framework 2.0:
"C:\Windows\Microsoft.NET\Framework\v2.0.50727\RegAsm.exe"
"C:\Windows\Microsoft.NET\Framework64\v2.0.50727\RegAsm.exe"
.NET Framework 4.0:
"C:\Windows\Microsoft.NET\Framework\v4.0.30319\RegAsm.exe"
"C:\Windows\Microsoft.NET\Framework64\v4.0.30319\RegAsm.exe"
The path to RegAsm.exe is stored in the variable <RegAsmExe>
To register .NET DLL assemblie from COM interop, go to the System \ Commands tab and add the following:
File: 		<RegAsmExe>
Parameters: 	"<InstallDir>\File.dll" /s /codebase
Launch on OS: 	Any
Show: 		Normal
Timing: 	After Installation
Wait: 		Yes
NOTE: flag /codebase creates a Codebase entry in the registry. The Codebase entry specifies the file path for an assembly that's not installed in the global assembly cache. Read more.
To unregister .NET DLL on uninstall, add the following:
File: 		<RegAsmExe>
Parameters: 	"<InstallDir>\File.dll" /s /u
Launch on OS: 	Any
Show: 		Normal
Timing: 	Before Uninstallation
Wait: 		Yes
Add two commands on the System \ Commands page.
1st command: this will install an assembly into the global assembly cache during installation:
File: gacutil.exe
Parameters: 	"<InstallDir>\File.dll" /i /silent
Launch on OS: 	Any
Show: 		Normal
Timing: 	After Installation
Wait: 		Yes
2nd command: this will remove the assembly from the global assembly cache during UnInstall:
File: gacutil.exe
Parameters: 	"<InstallDir>\File.dll" /u /silent
Launch on OS: 	Any
Show: 		Normal
Timing: 	Before Uninstallation
Wait: 		Yes